Followers

Tuesday, 18 September 2012

E17 Art Trail

Well the Art Trail is over for another year but it has been an exciting, as well as a tiring couple of weekends - but I must admit to looking forward to doing it all again next year!

I took part in a group show with a number of other designers, the main other ones being Harriet Hammel, soft scupltures, and Elizabeth Pell, paintings. Although I didn't sell anything I got a lot of positive feedback about my work and in particular was invited to submit some work to another up-coming exhibition at "The Mill" , a local community base that hosts exhibitions as part of his work and also to take part in their Christmas Craft fair.

Back home, and back to the day job, my current projects are a small pieced quilt based on a design from Barbara Chainey's book Fast Quilts from Fat Quarters and some of the fabrics I dyed at the Festival of Quilts, and then a Gold Altar Frontal for my local church. - Oh and some items to sell at the Christmas Craft Fair. Should keep me busy!
And here are some pics.
Painting by Elizabeth Pell and the Right Reverend Mother by Harriet Hammell

My Autumn Glow quilt and another of Elizabeth's wonderful paintings

Two of my pieces in the foreground looking to the back of the church.
More of Harriet's amazing soft sculptures - the detail she puts into these is incredible.
L

Thursday, 23 August 2012

Kindle and Festival of Quilts

I've been wanting to make a kindle cover for some time and now I have finally managed to do it. I've used a whole range of appliqué techniques and what seems to be one of  my "trademark"  fabrics, organza. There are four layers of appliqué in the finished piece - layered and cut into organza, Lutrador which I coloured with inktense pencils, stitched on to black cotton and cut away using a fabric soldering iron and then some of the pieces which were cut away were stitched back on, polyester dupion, lame and sparkly tulle which was over-stitched and then distressed using a heat gun, and finally icicles which were made from organza laid over lame.

Lots of layers, lots of stitching, and lots of texture! To line it I used a piece of self dyed shibori fabric which I dyed using woad which gives a lovely pastel blue.


I had a great time at the Festival of Quilts last week and especially enjoyed the three day masterclass taught by Jo Lovelock in which she taught a whole range of ways of dyeing fabric. It was quite hard work at times with lots of fabric which needed to be rinsed by hand and also some methods which involved having to agitate buckets of fabric for up to 10 minutes at a time. Amongst the most useful techniques taught were ones which enabled us to produce pieces of fabrics which shared gradations of colour within a family or with gradations of shades and colours. We were encouraged to mix colours and over dye fabrics and shown how to get texture into our fabric and to think about how to place colours to get different effects. Now all i have to do is sew it! Watch this space - I don't think I'll be buying any fabric for quite a while.

Monday, 20 August 2012

Fuschias

In some of my previous posts I have included pictures of pots/candle holders I have made using organza, dissolvable film and stitch. For some time I had thought about using this technique to make some hanging flowers - specifically fuschias as I love their colours. I had a suitable stand but not the correct shape glass to use as a mould. However when shopping in Sainsbury's a few weeks ago I came across some tumblers which were the shape and size I had been looking for and so I was able to start work - though still unsure about exactly how I was going to make the flowers - especially the outer petals.

I used the normal technique for the inner petals but cut the film to a circular shape to get a more regular edge.  Once these were completed I cut a paper template for the outer petals and then again used  the same mould - but allowed for an overlap so I could fit them over the inner petals. This worked and I carefully moulded the petals so they had the curve I wanted. After beading them I secured the two layers together with beads and stitching and then made beaded loops to hang each flower.


I'm really pleased with how these have come out - think I will have to try some snowdrops next.

Tuesday, 7 August 2012

Catching up

Well one of the joys of being on holiday is that I can catch up both with friends and also with sewing!
In terms of catching up with friends I had a lovely day last week with my friend Shirley and finally delivered her birthday present - "Shirley's birthday bouquet"
Here are a couple of pictures - the background is made from part of a jelly roll - cream patterns with gold highlights which I quilted with a feather filler design and then appliquéd lilies made from raw silk.

I'm taking part in the E17 Art trail this year so as well as asking Shirley if I can borrow this piece back I thought I ought to make a couple of new pieces. I had a very bright jelly roll which I bought last year which I had been wanting to use for some time and was inspired by the hot week we had at the start of the summer holidays to make this piece "Feeling hot, hot, hot"

I think it is clear what I meant by it being bright! To make the centre section stand out more I used two layers of wadding for this section and quilted it with a "flame" design and then quilted the remainder with a closer stitched filler pattern.


My final piece of catching up has been with my City and Guilds - I made myself get on with making up samples (my least favourite part it has to be said) and completed module 8 so that's been sent off and I'm waiting for feedback on my accessory design - it has to be said that the opportunity to go shopping for materials at the FOQ next week was an incentive to get on with the design of that.

Saturday, 21 July 2012

Baptism stole number two

Well I have finished the second of the stoles my sister asked me to make - and while it is again a Baptism stole the finished design is very different! Here is the finished stole

As before a step by step run through how I made it as I have had positive feedback from people who like these.

This was the starting design - the Priest who the stole is for has this on her visiting card and has wanted a stole made with this design for sometime. The PDF she sent me was very small and I couldn't enlarge it so I printed it off and photographed it.

I printed the design onto fabric,  roughly cut out the figures and then used temporary spray glue to apply to a backing. I then used a fine tight zig-zag around the edge and used straight stitch for the details in matching rayon threads. Once this was done I carefully trimmed around the edges.


To give further stability I backed the whole thing with calico - I could have put it straight onto the white backing but was afraid of it getting dirty/grubby. Another option would have been to use a tearaway stabiliser but for what I was making calico was fine as it gave extra body. I used a variegated cotton thread and an appliqué stitch which varies in width to follow clouds/tree shapes in the upper background. I then trimmed away the excess fabric. I then stitched "waves" across the bottom section again using a variegated thread, roughly following the print. To make the fish I used Angelina fibres, fused them, cut small fish shapes, and stitched around them with a straight stitch and then carefully pressed them again - remembering to use baking parchment to protect the iron. I again found spraying them with the temporary adhesive helpful as I could arrange them first and they were then help in place while I stitched them.


The final picture here shows the "fishing net" I stitched this using a lighter tone of blue thread - a rayon again this time and used triple stitch to give more substance to the net so it would show up.

I then assembled the stole - finished! Here are a couple of detailed images of the finished design.

I'm pleased with it - I just hope that the recipient is when she receives it.

Sunday, 10 June 2012

Finished piece and next steps


 I have finished the first of my two Baptism stoles. In my last post I included the design so now for some step-by-step photos.


This shows the organza layered up between two pieces of Romeo dis-solvable film. I used three wide strips as the base then layered up with strips and pieces of organza before a final piece to cover the whole thing. I shaded it from dark to light. The film holds the organza sandwich together and gives it more body thus making sewing easier and meaning there is no need to use an embroidery frame.


I then stitched across in "waves" again shading the threads from dark to light as I went up. I then washed away the film and let the piece dry flat. I had originally planned to cut into the top layer of the organza to reveal the layers beneath but I liked the way the colours blended into each other and that it had a real feel of water to it.  The next step was to cut the piece in half and use the stole pattern I had made to ensure I allowed both for the shape and for a seam allowance. 


The pins in this are there to hold the organza layer in place on the main fabric - a polyester dupion. I stitched across the top with a tight zig-zag to neaten it and to hold it in place. Once this was done I embellished it with beading - again shading these from dark to light.


One side of the completed stole - it is interlined with firm vilene and then lined with white cotton.
Here are a couple of other pictures.


I am pleased with how this has come out. It has also given me some new ideas for how I could organza to make a background for quilting!


Well I'm just keeping my fingers crossed at present - and not only because I've got to take my sewing machine in for repair. I have registered with the E17 Art Trail in my own right and I think I'm happy with what I've written as my "artist's statement" - very hard as I didn't want it too sound too over the top and become pretentious! Still I have got some time to edit it so I will probably send it to a friend or two who I can trust for constructive - but kind feedback! I have also entered three pieces into a local show "Soft" so it's fingers crossed to see if any/all get selected. Very scary as it's the first time my pieces will be "judged" by someone I don't know. Still with the month I've had so far I need something positive. 


My machine? Well I cleaned it, put in a new needle and started quilting Shirley's birthday quilt - feathers all going well when suddenly - the needle breaks. Not a disaster in itself but part of the needle seems to have lost inside the machine - so I really don't want to use it and risk doing damage! Next job - find a repair shop! - And then some hand projects! 


Saturday, 19 May 2012

Feathers and Ferret

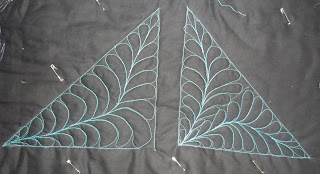
Great day on a free machine quilting workshop taught by Ferret who is one of my quilting heroes! I'd been looking forward to this workshop for ages as I did her Machine quilting part one workshop about 18 months ago and learnt a lot on that. Once again we were shown a whole range of patterns and while encouraged to try them all were also reminded that we all have our preferred designs that suit us and that we feel comfortable with.
To start off with we stitched flowers, hearts, pebbles, and then leaves and mussel shells.


We then moved on to the notorious feathers! We were shown a number of ways of sewing these and warned not to expect results first time. This was when I began to feel rather embarrassed as mine went well from the start!

Apart from not managing to fill a square I found feathers in general fun to do and enjoyed trying out all the different versions we were given.


I love the peacock feathers at the bottom and I'm now thinking about how I can get feathers into my next quilt.

At this stage Ferret announced to everyone else about me that "It's official, I hate her!" I feel so proud!!!